How to Help Your Child Survive An Active Shooting

I think that the necessity of teaching kids to survive a possible shooting is all wrong and crazy.
No parent (including myself) wants to hear, think, or talk about teaching kids this area of safety.
But, if nothing else, we can increase kids’ chances of survival; the stress of having this conversation is worth it.
What kids need to know:
- There is no one proven method to get out of this situation.
- Shooting usually lasts less than 5-10 minutes – kids need to survive this amount of time.
- They are on their own for that time until help arrives and need to commit to rescuing themselves – they should listen to their teachers, but keep in mind that they may not help everyone.
If your kids are young (3-5 years old), you can play games (see Practices below) and do not have any conversations until they can handle them.
If your kids are older (5-10 years old), you can gently start talking about what has helped people survive a shooting.
How to start this conversation:
Tips:
- It’s easier to have these conversations outside and while walking.
- Keep them under 3-5 minutes.
- Stop if you feel anxiety, fear, or resistance.
- Never force your child to talk about anything if he is not ready.
- Always answer questions.
- Leave the door open – tell your child he can always come to you with any question no matter how scary or weird it may seem – you are an adult, and you can handle it.
- Keep answers to a level kids can accept.
- Provide examples like this:
A librarian who saved 55 students had prior relevant experience of a similar situation and, as a result, following the “hide” part of the lockdown procedure:
- Recognized the sound of actual gunshots fast
- Pulled kids into the room and locked it
- Covered the window at the door
- ! Turned lights off
- Instructed kids to hide, stay put, and be quiet so that the room seemed empty
If you are not sure, you can be calm talking about it for the first time – show kids a video with a safety lesson by an elementary school teacher – it is listed in the resources at the end of this article.
How to make sure kids understand and remember what to do:
Kids forget things quickly.
Apart from having conversations, kids need to practice and reinforce the skills.
Safety is like swimming – you can’t teach it by just talking and watching videos.
Even though many schools do drills, it’s your responsibility as a parent to make sure your child understands and remembers what to do.
Kids need to know about 4 possible steps of surviving a shooting:
Recognize – Run - Hide – Fight
Step 1: Recognize the shooting
The faster people evacuate, the higher their chances for survival.
In situations of stress, people may freeze and waste crucial time not believing the shooting is happening.
This brain inertia is called “normalcy bias”.
It happens when the brain refuses to accept the danger and underestimates the possible effects. The brain believes that things will always function the way things usually have worked.
The faster people react, the higher the chances of running away.
That's why we need to have these conversations despite stress and anxiety.
How to help kids recognize the shooting fast
If kids are at school, they will most likely be alerted by their teacher or intercom systems.
In all other places, kids need to figure it out by themselves or follow the instructions of their trusted adult.
This includes knowing how guns sound and look.
Recognize shooting by sound: Take kids to a kid-friendly place where they can hear real gun sounds in a safe environment. In real life, the sound is different from the movies. Use ear protection.
Practice 1: Introduce kids to the sound and look of guns in a kid-friendly way:
-
- Military and history museums have open house days and do pretend battles. These guns may be old models, but they are still guns.
- If you or someone you know owns guns (and your kids are old enough), you can take them to a place where you practice and let them hear the sounds. It should be an age-appropriate and kid-safe place.
Recognize guns by look: find an appropriate place to show kids real guns
Practice 2: Teach kids the names and types of the most popular firearms (pistols, rifles, shotguns)
- Military or history museums often have modern guns on display.
- Your police department may organize field trips for kids and have a museum or an exhibition.
- Show your guns if you have them. Follow safety rules.
- A gun store or a hunt are not appropriate places for kids to have safety lessons.
- Teach kids that if they see a gun, they need to run and tell their trusted adult immediately (for example, a person in a grocery store with a visible weapon in a purse or pocket; any gun during a play date.)
Step 2: Run
Running from the building towards a safe location is the first option to consider.
At this step, the goal is to teach kids three things:
- Situation awareness
Teach your child to pay attention to what’s around you, how the environment changes, who is around you, and what feels odd (people who do not belong to the environment or alerting behaviors.)
Practice: [The course: “Teach Your Child Ultimate Safety” has an entire module of games to help kids build the skill of situation awareness]
- Spatial awareness
Teach your child to pay attention to the layouts of buildings, location of the stairs, corridors, hallways, emergency exits, windows, and mark them as possible evacuation routes.
+ Note the objects that can serve as covers (walls, columns, vending machines).
Practice 3: Figure out evacuation plans for the places you visit most often and practice modeling these plans until it becomes a habit. (This saves lives during fires and crowd emergencies as well.)
At some point, your child will see a pattern of how emergency layouts are designed in different public places and anticipate the stairs, exits, etc.
Practice 4: Check how to change the environment to let you evacuate (what can you use to break a window or force a locked exit door to open: fire extinguishers, heavy objects, tools, tactical flashlights, cubatons, tactical pens - google what they are).
- Move while changing directions and in zigzags in the open space
Shooting a moving target is times harder than someone who is still.
If you can, hide behind the objects - put objects between you and the shooter.
Practice 5: Take kids to a laser tag, Nerf gun place, squirt guns, or paintball obstacle course so that they can practice running and hiding.
Practice 6: Teach kids to run fast by signing them up for soccer, baseball, or athletic training.
Alternative Step 2: Hide
If evacuation is not possible, the next option is to hide.
An active shooter is less likely to force his way through locked doors than trying to find easier targets.
On this step, your goal is to teach kids to hide and never open the doors to anyone for any reason (shooters may pretend to be a victim asking for help or shelter in the room).
Remind kids that everyone must be quiet, all phones must be in a silent mode, lights off, blinds shut.
Call 911 – don’t assume someone already did!
Practice the skill of hiding during the shooting or home invasion:
Practice 7: Play classic hide and seek when kids play with each other or you.
Practice 8: Brainstorm Emergency hide and seek and find unusual hiding places (if your child is not with a group and needs to hide on his own.)
Precaution:
- Discuss with kids that most of these places are inappropriate and dangerous for regular hide and seek.
- Never let kids hide there during play.
- These are the places for hiding in case of a shooting emergency only.
- Make sure kids are not in danger of suffocation in those places (like dryers or washers).
- Make sure kids know how to get out of those places and can do it without help.
Walk around your house, class, church, or other building to find unusual places to hide in case of a shooting:
- Inside the cabinets and under the counters
- Lying flat under the piled covers, blankets, or laundry
- Any area several feet above the head level - people rarely look up
- Inside of boxes, chests, wagons, containers, drawers, or shelves
- In attics or sheds
- Under trampolines, flipped buckets, or boxes
Find as many as you can.
Discuss new places as you go to new buildings (stores, cinemas, parks, hospitals.)
Practice 9: Brainstorm unusual poses to hide:
-
- Climbing on top of the toilet inside a stall if you get stuck in a restroom - so that your legs are not visible from the outside
- Packing yourself into a tiny space that kids can fit into - in a child's pose on a chair, pushing yourself under a desk with the chair so that legs are not visible under the chair and you are covered by the desk
- Squeezing yourself into a tight or tiny space - a shelf under a desk, a locker, or between the pieces of furniture.
Practice 10: Stay put
Teach kids to stay in one position at the same place for 10-15 minutes without moving or making a sound.
Set a timer for one minute and tell your child to hide in some regular hide and seek place and stay there until the timer goes off.
Each round, increase the time minute by minute until kids can stay unnoticeable for 10-15 minutes while you are looking for them.
They should not disclose their location by making any sounds or movements (including giggling or breathing loudly after running to their place.)
Ensure kids don't respond to conversation prompts (shooters may knock on doors or pretend to yell for help).
Practice 11: Learn how to barricade doors
- By blocking it – using the furniture (desks, podiums, bookcases, shelves) or other heavy objects (bins, containers, boxes.) Try different layouts - putting the heaviest thing first to the door or last to the door and checking which version works better.
- By fixing the opening mechanisms:
- If you have a belt, loop and tighten it around the top part of the door closer - so that the arms opening the door can’t move. This is the thing ABOVE your head between the opening part of the door and the fixed part of the door.
- You can also tighten your belt around the door handle and attach it to something sturdy if it’s possible or hold it in your hands (standing by the side of the door avoiding the line of fire).
Step 3: Fight
This is the last resort – teach kids never to play a superhero.
Many kids believe they can fight a shooter.
Fighting is the last option. It may be used only if the other options are not available or failed to be executed (if the room has no place to hide, if the door cannot be locked or barricaded, or if the door was forced open).
Little kids are not supposed to fight a shooter. But kids need to know that an adult may fight with a shooter, and they should stay as far they can - running away if possible - because the direction of the shots becomes unpredictable.
Older kids also need to know that as a last resort, they may attack as a class throwing things, yelling, screaming, and keep running.
If you are an adult at school:
"What if nothing else" plan:
- Watch video three under this article.
- You are most likely to have something to protect yourself in your classroom already.
- Prepare yourself mentally to fight.
- Commit to action.
- Stay out of the line of the fire.
- Attack from the side of the door.
- Attack from different angles if you can involve several people.
- During your attack, make as much noise as possible to help other people know where the shooter is.
In this scenario, your biggest asset is unpredictability, focused aggression, and full force action.
The weakest places of the shooter are his vision and the trigger of the gun.
The most challenging lesson from law enforcement is:
“If the fight leaves room for just one winner, may it be you, never stop halfway.”
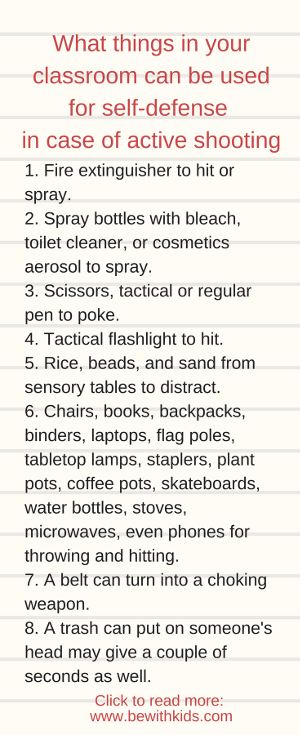
Practice 12: Brainstorm improvised weapons, hiding spots, and evacuation options in your class
You can use the following objects:
- Fire extinguisher to hit or spray.
- Spray bottles with bleach, toilet cleaner, or cosmetics aerosol to spray.
- Scissors, tactical or regular pen, cubaton to poke.
- Tactical flashlight to hit.
- Rice, beads, and sand from sensory tables to distract.
- Chairs, books, backpacks, binders, laptops, flag poles, tabletop lamps, staplers, plant pots, coffee pots, skateboards, water bottles, stoves, microwaves, even phones for throwing and hitting.
- A belt can turn into a choking weapon.
- Trash can put on someone's head may give a couple of seconds as well.
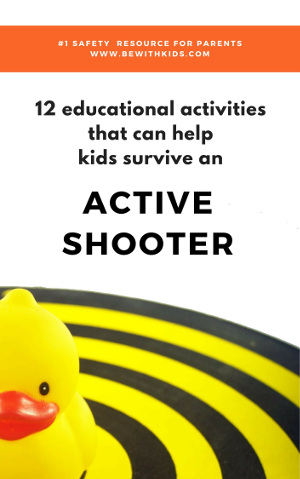
Download a free checklist
"12 educational activities for kids that can help survive an active shooter situation"
↓↓↓↓↓↓↓↓↓↓
A must-have resource that nobody wants, but everybody needs.
Be prepared if nothing else.
↑↑↑↑↑↑↑
Take action
Great job so far - safety is a challenging subject!
Please sign up above to see the next steps.
↑↑↑↑↑↑↑
Your input matters:
Hopefully, none of us will ever need to implement any of these tips.
If you’ve gotten to the end of this uneasy article – you are an amazing parent!
Your feedback matters!
Please, scroll to the comments and let us know what you think about this article.
More resources from the sites I love:
Articles:
https://amotherfarfromhome.com/what-every-mom-should-know-in-an-active-shooter-situation/
Videos:
- A lesson presented by an elementary teacher – she is talking to her class - there are no scary scenes in it.
https://www.youtube.com/watch?v=aQIR1pqd3k8
- This video demonstrates a lesson on what teachers are supposed to do during a lockdown.
https://www.youtube.com/watch?v=R6YjDmAnafQ
- A clip about the training at one of the schools – ! start from the minute 3.00 (the intro is sad)
Can your child keep himself safe when you are not around?
Recommended product

Full safety course for parents of kids 3-10 years old
A modern approach to safety with people
Can't find what you are looking for?
Please tell me what you are looking for and how I can help.
I'll be in touch.
Or try using the  search function at the top of the page.
Thank you Katy! I was going to ask you if you could discuss teaching kids about active shooters. We had a lockdown at our local high school this week due to a threat from a student who was known to have access to guns at home. Thankfully another student reported the threats and no one was hurt. It just hit way too close to home. I shared this to all of my mom groups on facebook.
Oh, I know what you are talking about. This is so sad that we need to teach our kids this topic.
Thankfully, this case has been prevented. The more we teach kids safety, the more of them will know what to do to prevent things from happening: “If you see something, say something”. Thank you for sharing!